
Have you ever considered how a small detail can truly change the whole feel of your home? It's almost amazing, really, what a difference the right finishing touches can make. When we talk about home improvements, often our thoughts go straight to big projects like kitchen renovations or bathroom remodels. But, there's a part of your house that gets a lot of use and can look so much better with a bit of attention: your stairs. They bridge different levels, after all, creating a natural flow in your living space.
Think about it for a moment, you know, how much character stairs add. They are a central structure, a pathway from one floor to another, and they really deserve to look their best. A lot of folks tend to overlook the trim around their staircases, but that's where stair baseboard molding comes in. It's a key piece that can make a good staircase look truly finished and wonderful. It brings a sense of completeness to the area, giving it a much more refined appearance.
This kind of molding isn't just about looks, though. It also plays a practical part in keeping your home tidy and protected. A well-chosen and correctly placed stair baseboard molding can hide small gaps where walls meet the floor, and it can also guard the lower part of your walls from scuffs and bumps. This is especially true in busy homes where stairs see a lot of foot traffic. So, it's a bit of a double win, isn't it?
Table of Contents
- Why Stair Baseboard Molding Matters for Your Home
- Choosing the Right Stair Baseboard Molding
- Preparing for Stair Baseboard Molding Installation
- The Installation Process: A Step-by-Step Look
- Common Challenges and Smart Solutions
- Maintaining Your Stair Baseboard Molding
- Frequently Asked Questions About Stair Baseboard Molding
- Ready for Your Stair Transformation?
Why Stair Baseboard Molding Matters for Your Home
The Finishing Touch Your Stairs Need
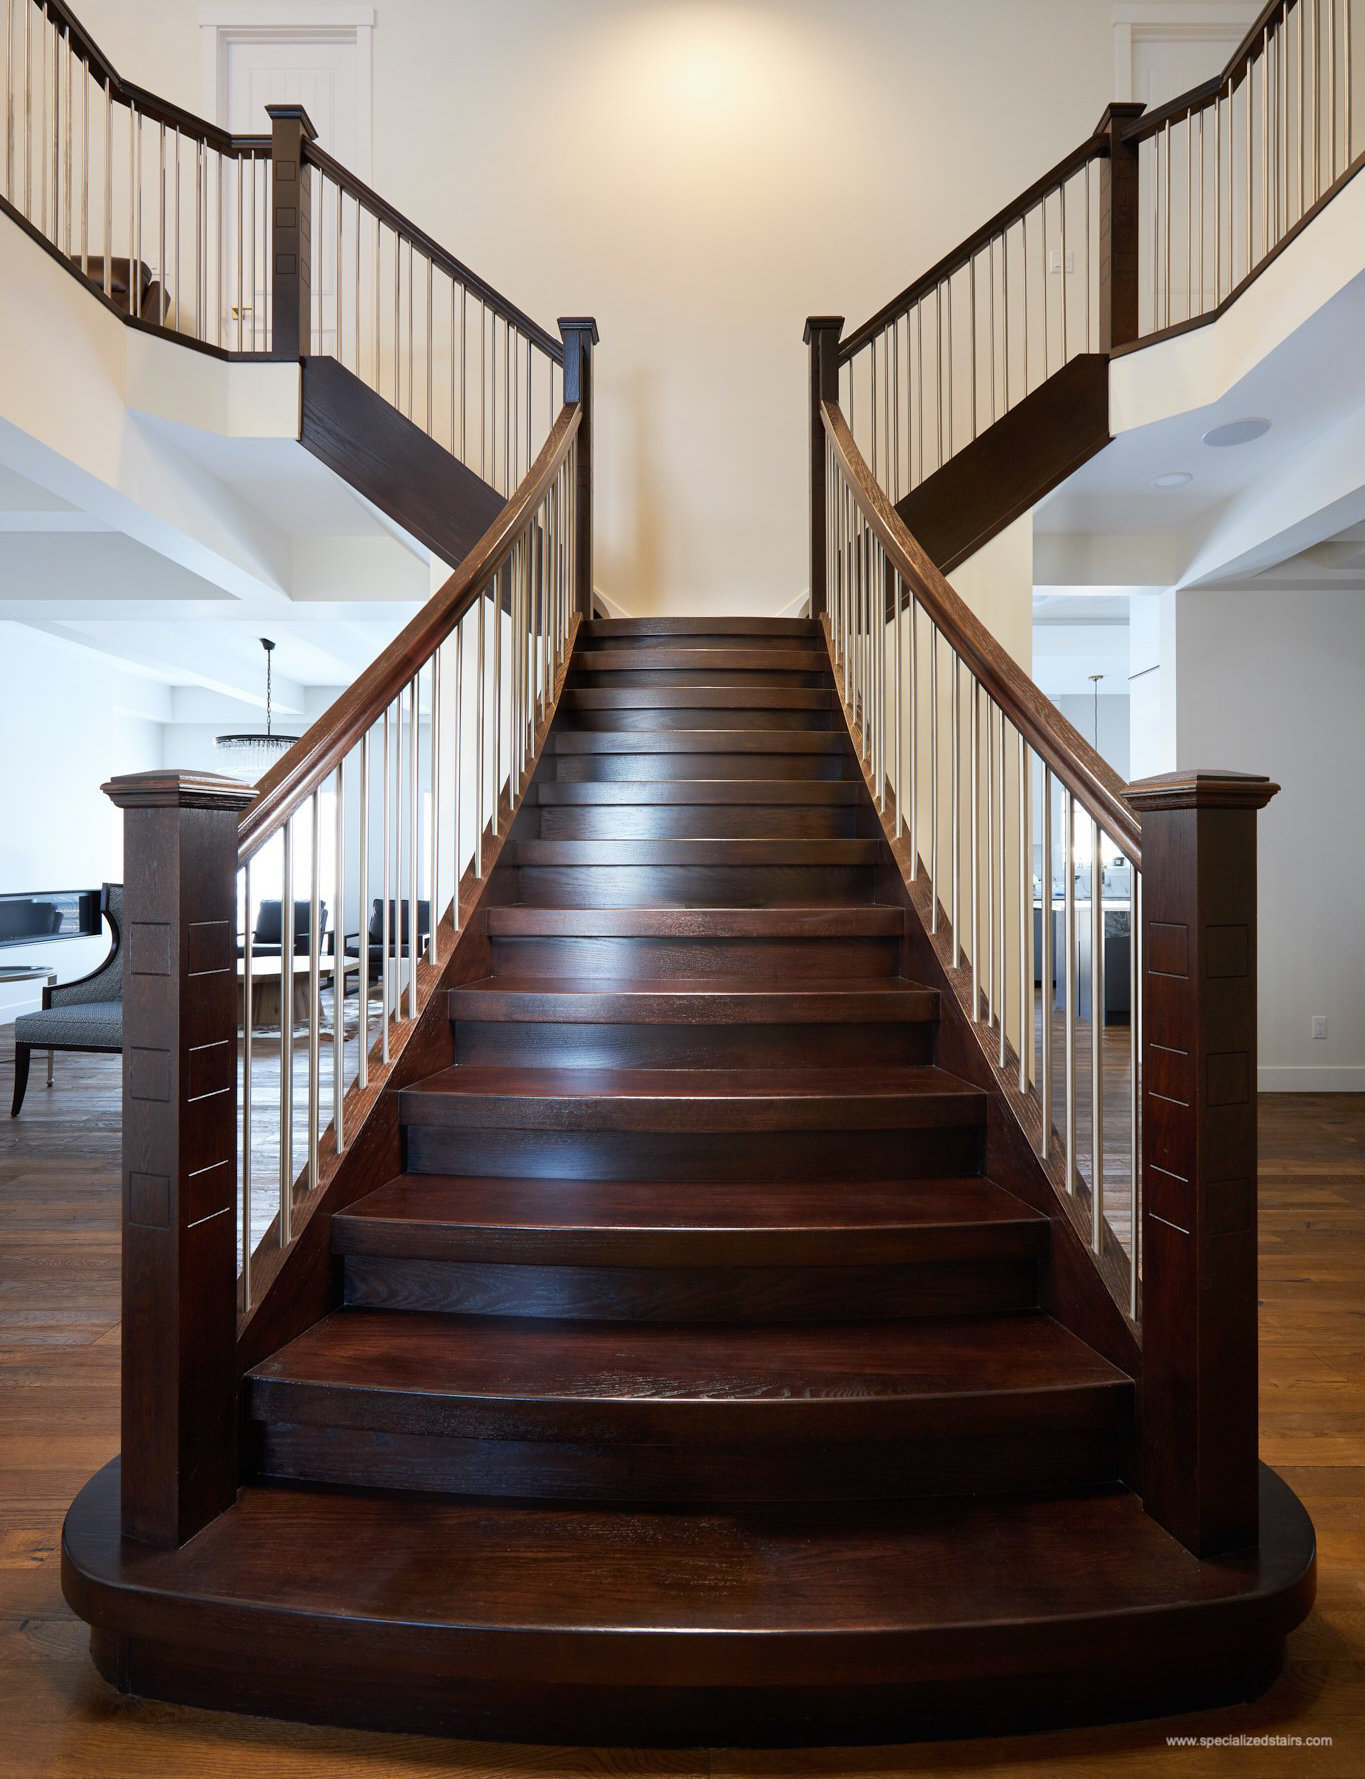
Stairs are, in a way, like a grand entrance or a quiet passage, depending on their placement. They are a structure designed to bridge a large vertical distance, connecting lower and higher levels. Without proper trim, the area where the wall meets the stair tread or riser can look unfinished. This is where stair baseboard molding steps in, providing that clean, crisp line that makes everything look so much more put together. It's almost like putting the final frame on a beautiful picture, you know?
A well-chosen molding can really pull the whole look of your staircase together. It can make a simple set of steps appear more substantial and elegant. For instance, at Stair Pros, we have decades of experience transforming homes in the Triangle area. We've seen firsthand how adding the right molding can freshen up existing stairs, making them a beautiful showcase for your home. It’s a detail that many people miss, but it makes a big visual impact, definitely.
Protecting Your Investment
Beyond just looking good, stair baseboard molding offers a layer of protection for your walls. Think about all the times shoes, vacuum cleaners, or even pets might brush against the lower part of your stair walls. Without a protective strip, those walls would quickly show scuffs, dents, and wear. This molding acts as a barrier, guarding against everyday bumps and scrapes. It’s a practical addition that helps keep your home looking good for longer, which is pretty smart, really.
This protective element can save you time and money on future wall repairs and repainting. It’s much easier to clean or touch up a piece of molding than to repair a damaged wall surface. So, it's a bit of an investment in the longevity of your home's appearance. This is especially important in high-traffic areas, where stairs are constantly in use, like your main entryway, perhaps.
Choosing the Right Stair Baseboard Molding
Different Styles and Materials
When picking stair baseboard molding, you have quite a few choices. There are many styles, from very simple and sleek to more ornate and traditional designs. Some popular options include colonial, modern, or even craftsman styles. The material matters too, you know. You can find molding made from solid wood, MDF (medium-density fiberboard), or even PVC. Each material has its own benefits and its own feel, in a way.
Solid wood, like oak or pine, offers a classic, sturdy feel and can be stained or painted. MDF is usually more budget-friendly and comes pre-primed, making it easy to paint. PVC is a good choice for areas where moisture might be a concern, as it resists water and rot. Considering these options helps you find what works best for your home and your lifestyle. You might want to think about how much wear and tear your stairs typically get, too.
Matching Your Home's Look
The goal is to pick molding that complements your home's existing style. If your home has a very traditional feel, a decorative, taller baseboard might be just right. For a more contemporary space, a simpler, cleaner line of molding would probably look better. It’s all about creating a cohesive look throughout your house. You want the molding to blend in, not stick out in a jarring way, you know?
Consider the baseboards already present in other rooms connected to the stairs. It’s usually a good idea to match them, or at least choose something very similar. This creates a smooth transition from one area to another. This attention to detail can really make your home feel more polished and thoughtfully designed, almost like a professional touch. So, take a look around, what kind of trim is already there?
Considering Durability and Maintenance
Some materials hold up better than others, especially in high-traffic areas like stairs. Solid wood is very durable but might need more regular care, like occasional re-staining or repainting. MDF is generally fine for most indoor uses, but it can swell if it gets wet. PVC is quite resilient and needs very little upkeep, which is pretty handy, actually.
Think about how much effort you want to put into keeping your molding looking good. If you prefer low maintenance, PVC or a good quality painted MDF might be a better choice. If you love the look of natural wood and don't mind the upkeep, then solid wood is a fine option. Your lifestyle and how busy your household is should definitely play a part in your decision, you know.
Preparing for Stair Baseboard Molding Installation
Tools and Supplies You'll Need
Getting ready for this project means gathering the right tools. You'll definitely need a miter saw for precise angle cuts, and a coping saw can be very helpful for creating snug joints. A measuring tape, a pencil, and a stud finder are also pretty essential. For attaching the molding, a nail gun (either pneumatic or electric) or a hammer and finish nails will be necessary. Don't forget wood glue for extra hold, either.
You'll also need the stair baseboard molding itself, of course, plus caulk, wood filler, sandpaper, and paint or stain to finish the job. Having everything ready before you start will make the process much smoother. It's really frustrating to stop midway because you're missing something, isn't it? So, a quick check of your supplies list is a good idea.
Measuring Up for Success
Accurate measurements are very important for a good outcome. Measure each section of the stair wall where the molding will go, taking into account both the length and the angles. Stairs are rarely just straight lines, so you’ll encounter various angles where the molding meets the risers and treads. It's often a good idea to measure twice and cut once, as the old saying goes. This helps avoid waste, you know.
When you measure, consider adding a little extra length to your cuts, just to be safe. You can always trim a bit off, but you can't add it back on. This small buffer can save you from having to buy more material if you make a slight error. So, be patient with your measuring; it really pays off in the end, actually.
Wall Preparation and Safety First
Before you attach any molding, make sure the walls are clean, dry, and free of any debris. If you're replacing old molding, remove it carefully and patch any holes or damage to the wall. A smooth, even surface is best for the new molding to sit flush against. This step, while seemingly small, really impacts the final look, you know.
Safety is always important. Wear safety glasses when cutting, and use gloves to protect your hands. Make sure your work area is well-lit and clear of obstacles. If you're using power tools, always follow the manufacturer's instructions. A little bit of caution goes a long way to prevent accidents, which is pretty clear, right?
The Installation Process: A Step-by-Step Look
Cutting Angles and Coping Joints
This is often the trickiest part of installing stair baseboard molding. Stairs have many different angles, especially where the molding runs along the stringer (the diagonal support for the steps) and meets a vertical wall or another piece of molding. You’ll use your miter saw to cut the correct angles for these transitions. For inside corners, a coping saw can create a very neat, seamless joint. This method, called coping, involves cutting one piece of molding to fit precisely against the profile of another. It’s a bit of an art, really, but it makes a big difference in the finished look.
Practice cuts on scrap pieces of molding are a very good idea before you cut your final pieces. This helps you get a feel for the angles and how your saw behaves. Remember that stair angles can vary slightly, even on the same staircase, so measure each section individually. Don't assume all angles will be identical, as that can lead to gaps, you know. It’s a bit of a puzzle sometimes, but very satisfying when you get it right.
Attaching the Molding Securely
Once your pieces are cut, it’s time to attach them. Apply a thin bead of wood glue to the back of the molding where it will meet the wall. Then, position the molding and use your nail gun or hammer to secure it to the wall studs. Aim for nails every 12 to 16 inches, making sure they penetrate into the studs for a strong hold. If you can't hit a stud, use construction adhesive along with nails for extra grip. This ensures the molding stays firmly in place, which is pretty important, actually.
Make sure the molding is level and straight as you attach it. A small level can be very helpful here, especially on longer runs. Press the molding firmly against the wall as you nail it to ensure a tight fit. You want it to look like it’s always been there, seamlessly integrated into the wall. So, take your time with this part, you know.
Handling Tricky Corners and Landings
Stair baseboard molding often involves more than just straight runs. You’ll encounter outside corners, inside corners, and transitions onto landings. Outside corners usually require miter cuts that meet perfectly to form a crisp edge. Inside corners can be mitered or coped, with coping often giving a cleaner, tighter joint that hides imperfections better. Landings require careful planning to ensure the baseboard flows smoothly from the stair angle to the flat wall. This might involve a small, angled piece to bridge the gap, you know.
Sometimes, you might need to use a small piece of scrap molding to test an angle before cutting your main piece. This is especially true for those really odd angles that stairs can sometimes present. Don't be afraid to experiment a little with your cuts on practice pieces. It's better to waste a small bit of material than to ruin a whole length of molding, which is pretty obvious, right?
Finishing Touches for a Polished Appearance
After the molding is installed, the real magic happens with the finishing touches. Fill all nail holes with wood filler, letting it dry completely before sanding it smooth. Then, apply a thin bead of paintable caulk along the top edge of the molding where it meets the wall, and along any joints or seams. This hides any small gaps and creates a very clean, professional look. It’s almost like airbrushing the final details, you know.
Once the caulk and filler are dry, you can paint or stain your stair baseboard molding to match your trim or complement your wall color. Two coats are usually best for a durable, even finish. This final step truly transforms the molding from raw material into a beautiful, integrated part of your home. It makes all the hard work worth it, really.
Common Challenges and Smart Solutions
Dealing with Uneven Walls
It's very rare for walls to be perfectly straight or flat. You might find that your stair baseboard molding doesn't sit flush against the wall in some spots. This is a common issue, actually. For minor gaps, caulk can work wonders, filling the space and making it look seamless. For larger gaps, you might need to use shims behind the molding to push it out, or even plane down the back of the molding slightly to fit the contour of the wall. It’s a bit of a trick, but it works.
Another approach is to use a slightly more flexible caulk that can handle a bit of movement. Sometimes, you just have to work with what the house gives you. Remember, the goal is a visually pleasing result, so a small amount of adjustment is perfectly fine. Don't strive for absolute perfection if it's going to drive you crazy, you know.
Gaps and How to Fix Them
Despite your best efforts, you might end up with small gaps where two pieces of molding meet, or where the molding meets the floor or ceiling. This is where wood filler and caulk become your best friends. For mitered joints that don't quite close, a bit of wood filler can fill the void, and then you can sand it smooth before painting. For gaps along the top or bottom edges, a clean bead of caulk will seal them up nicely. It’s amazing how much a little caulk can do, really.
Using painter's tape can help you create a very straight line when applying caulk. Just run the tape along either side of the gap, apply the caulk, smooth it with a wet finger or tool, and then remove the tape before the caulk dries. This gives you a very crisp, professional finish. It’s a simple technique that yields great results, you know.
Working Around Existing Stair Elements
Stairs often have existing elements like newel posts, balusters, or handrails that the baseboard molding needs to flow around. This requires careful notching and cutting to ensure a tight fit. You might need to use a jigsaw or a multi-tool to make precise cuts around these obstacles. Taking your time and making templates from cardboard can be very helpful for these complex cuts. It’s almost like custom fitting a piece of clothing, you know.
Sometimes, it's easier to remove certain stair parts temporarily if possible, especially if you're doing a full stair remodel. However, if that's not an option, careful measuring and precise cutting are essential. Remember that building codes regulate many aspects of stair design, from tread width to riser height, to ensure safe passage. So, your molding needs to fit around these regulated elements without interfering with their function or safety. For more details on custom stair and railing construction, you can find the best stair builders in Cary, NC on Porch.com, which is a very helpful resource.
Maintaining Your Stair Baseboard Molding
Keeping it Clean and Fresh
Once your stair baseboard molding is installed and finished, keeping it clean is pretty straightforward. Regular dusting with a soft cloth or a vacuum cleaner attachment will prevent dirt and grime buildup. For painted molding, a damp cloth with a mild all-purpose cleaner can wipe away scuffs and marks. For stained wood, use a wood cleaner or polish specifically designed for that finish. This simple upkeep keeps your molding looking its best, you know.
Avoid using abrasive cleaners or scrub brushes, as these can damage the finish. A gentle approach is always best. A quick wipe down every now and then can make a big difference in the overall appearance of your staircase. It's a bit like caring for any other piece of furniture in your home, really.
Repairing Minor Damage
Even with careful use, accidents happen. If your stair baseboard molding gets a small dent or scratch, it's usually easy to fix. For painted molding, a little wood filler can patch dents, followed by light sanding and a touch-up with paint. For stained wood, you might be able to use a wood repair marker or a touch-up stain pen to hide scratches. This keeps your molding looking sharp and new, you know.
For deeper gouges or larger areas of damage, you might need to remove a section of the molding and replace it. This is where having some extra material on hand can be very useful. Addressing minor damage quickly prevents it from becoming a bigger problem down the line. It's a bit like tending to a small cut before it gets infected, right?
Frequently Asked Questions About Stair Baseboard Molding
Q: Can I install stair baseboard molding myself, or should I hire a professional?
A: Installing stair baseboard molding can be a very rewarding DIY project, especially if you have some experience with basic carpentry and tools. The angles and cuts can be tricky, so patience and precise measuring are key. If you're not comfortable with power tools or intricate cuts, or if your stairs have many complex turns, hiring a professional like those at Stair Pros might be a better choice. They have the experience to create a beautiful, new showcase for your home, and they can freshen up your existing stairs, too.
Q: What's the difference between baseboard and shoe molding for stairs?
A: Baseboard molding is the wider, taller trim that runs along the bottom of the wall, typically against the floor or, in this case, along the stair stringer. Shoe molding, which is sometimes called quarter-round, is a much smaller, thinner piece of trim. It's usually used at the very bottom of baseboard, where the baseboard meets the floor, to cover any small gaps. On stairs, shoe molding isn't always used with baseboard molding, but it can be applied where the baseboard meets the stair tread if there's a small gap that needs covering. It’s a very specific use, you know.
Q: How do I calculate how much stair baseboard molding I need?
A: To figure out how much stair baseboard molding you need, measure the length of each section where the molding will be installed. This includes the diagonal runs along the stringers and any horizontal sections on landings. Add all these measurements together. It's always a good idea to add an extra 10-15% to your total length for waste, mistakes, and


Detail Author:
- Name : Sandra Mueller
- Username : jorge57
- Email : bechtelar.xavier@wunsch.org
- Birthdate : 1993-06-24
- Address : 462 Schowalter Land Apt. 091 South Okey, MD 67498
- Phone : +13477716522
- Company : Barton-Volkman
- Job : Agricultural Crop Worker
- Bio : Et officia qui qui illo. Quis praesentium vitae officiis atque amet ratione nihil nisi. Quibusdam pariatur ex voluptate et qui inventore quo.
Socials
facebook:
- url : https://facebook.com/zola.mcdermott
- username : zola.mcdermott
- bio : Aspernatur aliquid natus corrupti perferendis fugit temporibus qui.
- followers : 3640
- following : 849
tiktok:
- url : https://tiktok.com/@mcdermottz
- username : mcdermottz
- bio : At asperiores et quibusdam similique. Nam natus omnis culpa nihil aut ad.
- followers : 320
- following : 2072
