
Building a solid network connection at home or for your business often starts with the right cables, and Cat6 is a popular choice for speed and stability. Knowing the proper Cat6 wire diagram is, frankly, a huge help for anyone looking to set up their own ethernet cables. It is that visual guide showing you just how to line up those tiny wires inside your cable with the right spots on the connector.
Getting this wiring just right makes all the difference for your internet speed and how smoothly your devices talk to each other. A messy connection, or one that isn't quite right, can slow things down, which is, you know, a bit of a headache for things like streaming or even for your business operations. For instance, think about how important a quick, steady network is for systems that need to process things fast, like point of sale software that syncs with QuickBooks Desktop; it really needs a good connection.
This article aims to give you a very clear guide to the Cat6 wiring diagram, why it matters for installations, and how you can use it well for your network setup. We'll look at the common ways to wire these cables, making sure your network runs as smoothly as possible. So, you can feel confident making your own reliable connections for your home or small business needs, which is pretty neat.
Table of Contents
- What is Cat6 and Why It Matters
- Understanding the Cat6 Wiring Diagram Basics
- Tools You'll Need for Wiring Cat6
- Step-by-Step: How to Wire a Cat6 RJ45 Connector
- Wiring a Cat6 RJ45 Wall Socket
- Testing Your Cat6 Connection
- Troubleshooting Common Cat6 Wiring Issues
- FAQs About Cat6 Wiring
- The Importance of Proper Cat6 Wiring for Your Systems
What is Cat6 and Why It Matters
Cat6, or Category 6, cable is a type of twisted pair cable that's often used for Ethernet networks. It's built to handle speeds up to 1 Gigabit per second (Gbps) over 100 meters, and even 10 Gbps over shorter distances, which is pretty fast. This kind of cable is made up of four twisted pairs of wires, and that twisting helps reduce interference, making your network more reliable. So, if you're looking for stable and quicker connections, Cat6 is, in a way, a very good choice for many setups today.
The reason Cat6 is so popular is that it offers a good balance between performance and cost. It's better than older Cat5e cables for speed, but often less expensive than Cat7 or Cat8. For a home network, or even a small business that uses systems like point of sale software, having a dependable network cable means your operations run smoothly. You know, a good cable helps manage sales, inventory, and customers without frustrating slowdowns, which is a big plus.
Understanding the Cat6 wire diagram is, honestly, a fundamental skill for anyone wanting to get the most out of these cables. It helps you make sure every wire goes exactly where it should, preventing connection problems before they even start. A proper diagram makes it simple to see how to connect the eight wires inside the Cat6 cable to the right pins on the RJ45 connector, which is a very important step.
Understanding the Cat6 Wiring Diagram Basics
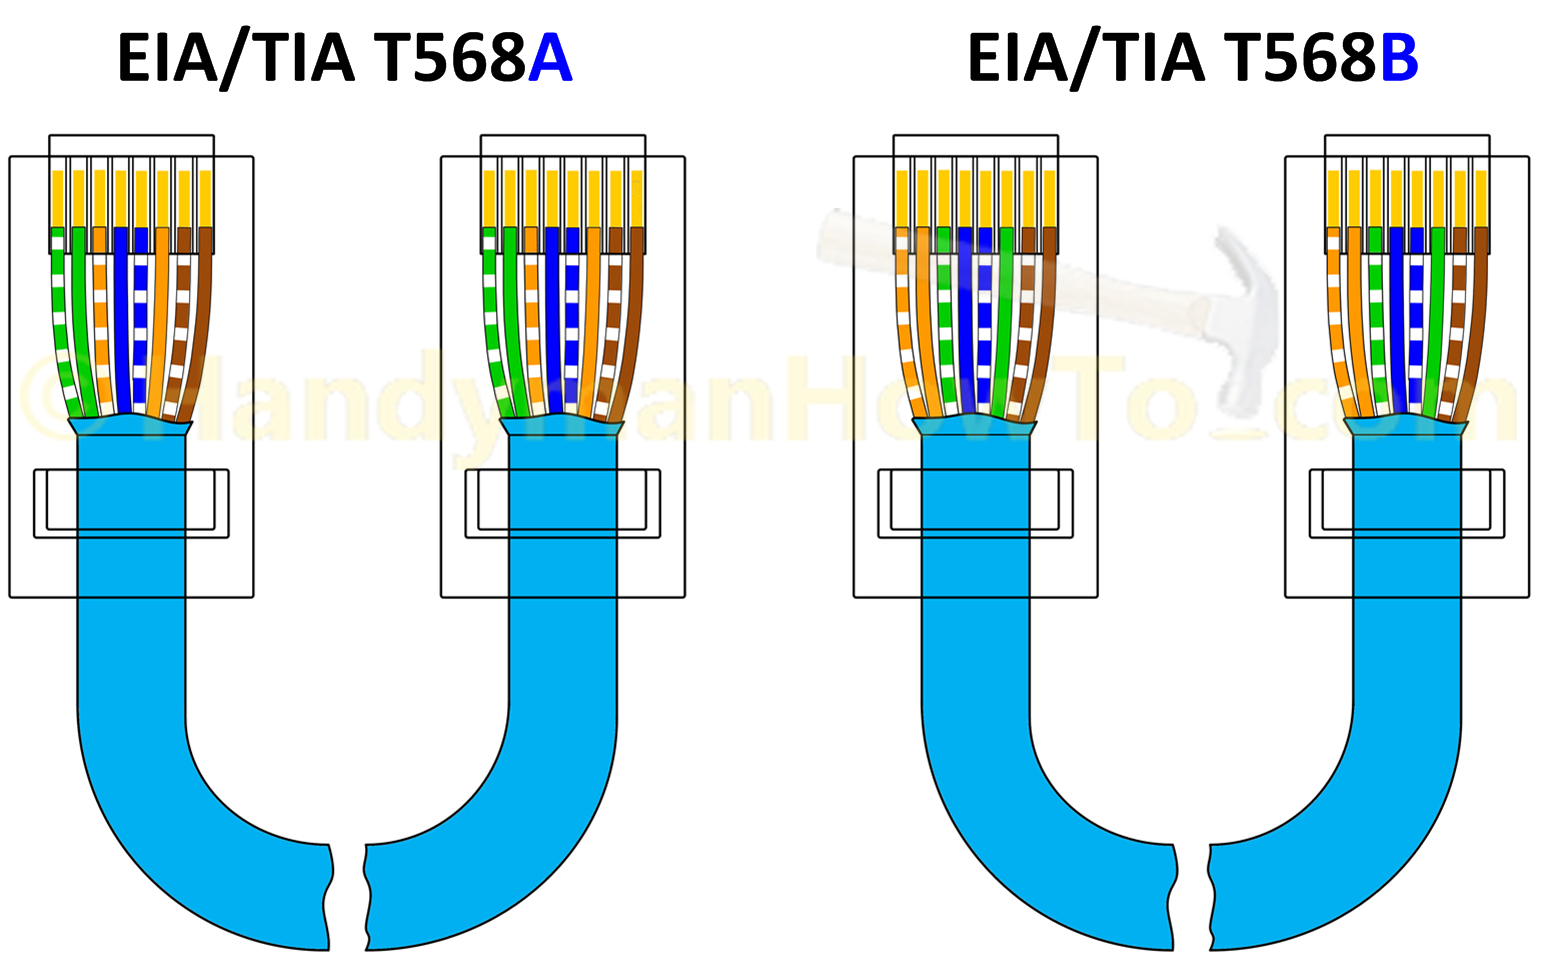
A Cat6 wiring diagram is, basically, a map for connecting the wires inside your Ethernet cable to the pins on an RJ45 connector. These connectors are the clear plastic plugs you see at the end of network cables. There are two main wiring standards you need to know about: T568B and T568A. Both standards arrange the eight colored wires in a specific order, and following these orders is, you know, absolutely key for a working connection.
Each standard has a different color code and pinout configuration. You'll find that a typical Cat6 wiring diagram includes a detailed visual representation of these arrangements. It's like a blueprint, really, showing you which colored wire goes into which numbered pin on the RJ45 connector. This visual aid makes the whole process much clearer, especially for someone doing it for the first time, which is very helpful.
Learning how to read and use a Cat6 wiring diagram helps you create clean, reliable Ethernet connections. It's not just about getting the wires in; it's about getting them in the right sequence. This precision helps ensure your network operates at its best, providing fast and steady data flow. So, paying attention to the diagram is, in some respects, a very smart move.
T568B: The Most Common Standard
When wiring a Cat6 cable, it is, in fact, important to follow either the T568B or T568A wiring standard. The T568B standard is, generally speaking, the most widely used in North America and for most new network installations. If you're connecting devices like computers, routers, or switches, you'll almost always use T568B for both ends of your cable. This consistency ensures your devices can communicate properly.
Here's the color order for the T568B standard, from pin 1 to pin 8 on the RJ45 connector, with the clip facing away from you:
- Pin 1: White/Orange
- Pin 2: Orange
- Pin 3: White/Green
- Pin 4: Blue
- Pin 5: White/Blue
- Pin 6: Green
- Pin 7: White/Brown
- Pin 8: Brown
This specific arrangement allows for proper signal transmission and reception. Many network professionals and DIYers find this standard very straightforward once they get the hang of it. It's a bit like learning a new language, but for wires, and it's quite useful to know.
T568A: Another Important Standard
While T568B is very common, it's also good to know about the T568A standard. This standard is, sometimes, used in older installations or in certain government applications. The main difference between T568A and T568B is the swapping of the green and orange wire pairs. It's a small change, but a very important one if you're trying to match an existing setup.
Here's the color order for the T568A standard, again from pin 1 to pin 8 on the RJ45 connector, with the clip facing away:
- Pin 1: White/Green
- Pin 2: Green
- Pin 3: White/Orange
- Pin 4: Blue
- Pin 5: White/Blue
- Pin 6: Orange
- Pin 7: White/Brown
- Pin 8: Brown
You'll notice that the blue and brown pairs stay in the same position in both standards. The key is that the orange and green pairs switch places. Understanding this difference is, you know, quite helpful if you ever come across a network that uses T568A, so you can make sure your new cables fit right in.
Straight-Through vs. Crossover Cables
Knowing about T568A and T568B brings us to two types of Ethernet cables: straight-through and crossover. A straight-through cable is, essentially, the most common type you'll use for connecting a computer to a router or a switch. For this kind of cable, both ends are wired using the exact same standard, typically T568B on both sides. So, pin 1 on one end connects to pin 1 on the other, and so on, which is very simple.
A crossover cable, on the other hand, is used for connecting two similar devices directly, like two computers or two switches, without a router in between. To make a crossover cable, one end is wired using the T568A standard, and the other end is wired using the T568B standard. This arrangement allows the transmit pins on one end to connect to the receive pins on the other, which is, you know, pretty clever. Today, with modern network equipment having "Auto-MDIX" features, crossover cables are less often needed, but it's still good to know what they are for, just in case.
Tools You'll Need for Wiring Cat6
Before you start wiring your Cat6 cables, having the right tools makes the job much easier and more precise. You don't need a huge collection of specialized gear, but a few key items are, honestly, pretty essential. Using the correct tools helps you achieve a clean, reliable connection, which is, you know, what we're aiming for here.
Here's a list of what you'll typically need:
- Cat6 Bulk Cable: This is the long spool of cable you'll be cutting to length. Make sure it's rated for Cat6.
- RJ45 Connectors: These are the clear plastic plugs. Make sure they are specifically for Cat6, as Cat5e connectors might not fit the slightly thicker Cat6 wires properly.
- Crimping Tool: This specialized tool is used to attach the RJ45 connector to the cable, pressing the pins into the wires. It's, basically, what makes the connection solid.
- Wire Strippers/Cutters: You'll need these to carefully remove the outer jacket of the cable without damaging the twisted pairs inside. Some crimping tools have a built-in stripper, which is quite handy.
- Cable Tester: After you've crimped both ends, a cable tester is, very much, your best friend. It checks if all eight wires are connected correctly and in the right order. This step is, arguably, non-negotiable for ensuring your cable works.
- Scissors or Snips: For trimming the internal wires to the correct length before inserting them into the connector.
Having these tools ready before you begin will, actually, save you a lot of time and frustration. It's a bit like having all your ingredients ready before you start cooking; it just makes the whole process smoother, which is what we want for your network setup.
Step-by-Step: How to Wire a Cat6 RJ45 Connector
Wiring a Cat6 RJ45 connector might seem a little tricky at first, but if you follow these steps carefully, you'll be making your own cables in no time. Remember, the goal is to get those eight tiny wires into the correct order and then securely crimped into the connector. This process, in a way, needs a steady hand and a good eye for detail.
Here’s how you do it:
- Cut and Strip the Cable: First, cut your Cat6 bulk cable to the desired length. Then, using your wire strippers, carefully remove about 1 inch (2.5 cm) of the outer jacket from one end of the cable. Be very careful not to cut or nick the twisted pairs inside. You'll see four colored twisted pairs, which is what you're working with.
- Untwist and Straighten Wires: Gently untwist each of the four wire pairs. Once untwisted, straighten out each of the eight individual wires. It helps to flatten them out a bit so they lay side-by-side. This step is, you know, pretty important for getting them into the connector correctly.
- Arrange Wires According to Standard: Now, arrange the eight wires in the specific order for either T568B or T568A. As mentioned, T568B is most common. Hold the wires flat and close together, making sure they stay in order. This is where your Cat6 wire diagram becomes, basically, your cheat sheet.
- Trim Wires Evenly: Once the wires are in the correct order and flattened, use your scissors or snips to trim them all to the same length. You want about 1/2 inch (1.25 cm) of exposed wires from the jacket. A clean, even cut is, frankly, very important for a good connection.
- Insert into RJ45 Connector: Carefully insert the arranged wires into the RJ45 connector. Make sure the clip of the connector is facing away from you, and the wires slide all the way to the front of the connector, touching the gold pins. Double-check that the wire order is still correct through the clear plastic. You should see the cable jacket extending slightly into the connector, providing strain relief, which is a very good sign.
- Crimp the Connector: Place the RJ45 connector, with the wires fully inserted, into the crimping tool's RJ45 slot. Squeeze the handles of the crimping tool firmly and completely until you hear a click or feel it bottom out. This action pushes the gold pins down, piercing the wire insulation and making electrical contact. It's, basically, the final step in securing the connection.
Repeat these steps for the other end of the cable, making sure to use the same standard (T568B to T568B for a straight-through cable). Following these steps carefully will help you create reliable connections for Cat6 cables, which is, you know, pretty satisfying.
Wiring a Cat6 RJ45 Wall Socket
Wiring a Cat6 RJ45 wall socket, also called a keystone jack, is a bit different from crimping an RJ45 connector, but it's just as important for a tidy and organized network setup. These wall sockets are, generally, used for permanent network points in your walls, letting you plug in devices without having cables running everywhere. A Cat6 wiring diagram for a wall socket will show you how to connect the wires properly into the jack's punch-down terminals, which is a little different from the crimping process.
Most keystone jacks have color-coded labels right on them, showing both the T568A and T568B patterns. This is, honestly, very helpful as it guides you directly. You'll strip the outer jacket of the Cat6 cable, just like before, but you won't untwist the pairs as much. You'll then place each wire into its corresponding slot on the keystone jack, following either the A or B standard. A punch-down tool is then used to push the wire firmly into the slot, cutting off any excess wire in the process. This creates a solid connection, which is, you know, what you want for a wall outlet.
Properly wiring a Cat6 wall socket with a wiring diagram ensures proper installation and connection of your Ethernet network. It makes your network points clean and reliable, which is, basically, a big step towards a professional-looking and functioning network. This method is, in a way, designed for more permanent installations, giving you a very neat finish.
Testing Your Cat6 Connection
After you've wired your Cat6 cable, whether it's a patch cable or a wall outlet, the very next thing you should do is test it. Skipping this step is, frankly, a common mistake that can lead to a lot of frustration later on if something isn't working right. A cable tester is, basically, an essential tool for this part of the job. It helps confirm that all eight wires are connected correctly from one end to the other and that there are no breaks or shorts in the line.
Most cable testers have two parts: a main unit and a remote unit. You plug one end of your newly wired Cat6 cable into the main unit and the other end into the remote unit. When you turn the tester on, it will send a signal through each wire, and lights on both units will light up in sequence, usually from 1 to 8. If all the lights illuminate in the correct order on both ends, and there are no missing lights or out-of-sequence lights, then your cable is, very likely, wired correctly. If something is off, the tester will show you exactly which wire pair has an issue, which is, you know, incredibly helpful for troubleshooting.
Testing your Cat6 cable ensures that your hard work results in a reliable network connection. It's a quick step that saves a lot of potential headaches down the line, giving you peace of mind that your network will perform as expected. So, never skip the test; it's, arguably, just as important as the wiring itself.
Troubleshooting Common Cat6 Wiring Issues
Even with a clear Cat6 wire diagram and careful steps, you might run into a few issues. Don't worry, that's pretty normal, and most problems are, honestly, easy to fix once you know what to look for. The cable tester we just talked about is, basically, your first line of defense here, as it points you to the problem area. Knowing some common issues can help you figure out what went wrong, which is, you know, pretty empowering.
Here are some common problems and how to approach them:
- No Connection at All: If your cable tester shows no lights, or if your device isn't recognizing the connection, the most common culprit is a wire that didn't make full contact with the pin in the RJ45 connector. This could happen if the wires weren't pushed all the way to the front of the connector before crimping, or if the crimping tool wasn't fully squeezed. Re-crimping or even re-doing the end might be needed.
- Incorrect Wire Order: If your cable tester shows lights out of sequence (e.g., pin 3 lights up when pin 2 should), you've likely mixed up the wire order. Go back to your Cat6 wire diagram and carefully re-arrange the wires according to the T568B or T568A standard. This is, in a way, a very common beginner mistake, so don't feel bad if it happens.
- Short Circuit: A short happens when two wires that shouldn't touch are touching. Your cable tester might indicate this. This can happen if you stripped too much of the outer jacket, leaving too much bare wire exposed inside the connector, or if the twisted pairs weren't trimmed evenly. Make sure the jacket extends into the connector for proper insulation, which is, you know, pretty important.
- Open Circuit: This means a wire isn't connected at all. Again, the tester will show a missing light. It could be a bad crimp, a wire that wasn't pushed far enough into the connector, or a wire that got cut during the stripping process. Check for nicks or cuts on the wires before you crimp.
Patience and a bit of detective work are, basically, what you need for troubleshooting. Often, simply re-doing one or both ends of the cable with extra care solves most issues. It's a learning process, and with each cable you wire, you'll get better at it, which is, you know, pretty cool.
FAQs About Cat6 Wiring
People often have questions when they're getting ready to wire Cat6 cables. Here are some common ones that come up, which is, you know, pretty helpful to address.
What is the difference between T568A and T568B wiring standards for Cat6 cables?
The main difference between T568A and T568B wiring standards for Cat6 cables lies in the color order of the twisted pairs. T568B, which is the most common standard in many places, swaps the orange and green wire pairs compared to T568A. So, if you look at a Cat6 wire diagram, the sequence of colors for pins 1, 2, 3, and 6 will be different between the two standards. Both standards work just fine for network connections, but you need to use the same standard on both ends of a straight-through cable, which is, you know, pretty important for it to work.
Do I need special RJ45 connectors for Cat6, or can I use Cat5e connectors?
You really should use RJ45 connectors specifically designed for Cat6 cables. Cat6 cables have slightly thicker wires and a larger overall diameter compared to Cat5e. Using a Cat5e connector with a Cat6 cable might mean the wires don't fit properly into the channels, or the connector's internal pins might not make proper contact with the wires. This can lead to a poor connection or even no connection at all. So, for the best results and a reliable network, it's, basically, always better to use Cat6-rated connectors with Cat6 cable.
How can I tell if my Cat6 cable is wired correctly without a professional tester?
While a professional cable tester is the best way to verify a Cat6 cable is wired correctly, you can do a basic check by plugging it into two devices you know are working, like a computer and a router. If the network link lights on both devices illuminate and you can access the internet or the network, then your cable is, very likely, working. However, this method won't tell you if there are any subtle issues, like a wire that's barely making contact or a short that might cause intermittent problems. For complete peace of mind, a proper cable tester is, honestly, the way to go.
The Importance of Proper Cat6 Wiring for Your Systems
Getting your Cat6 wiring right is, honestly, more than just a technical detail; it's a foundational step for any reliable digital setup. Think about how important a smooth network is for operations that need constant, quick data flow. For example, systems that streamline retail with point of sale software that syncs Shopify POS and QuickBooks Desktop really depend on a solid network connection. If your wiring isn't up to par, these systems can slow down, which, you know, slows down your business potential.
QuickBooks POS, for instance, is ranked quite high in product directories, and its ability to seamlessly integrate with QuickBooks for accounting is a big advantage. But this seamless integration relies heavily on the underlying network infrastructure. Processing sales operations, managing inventory, and keeping customer records all in one place works best when your network cables are wired correctly. A detailed diagram of Cat6 pinout with clear labeling for wiring standards and connections helps you understand proper cable configurations, ensuring your systems perform their best.
Learning how to wire Cat6 cables with detailed diagrams, knowing the tools needed, understanding preparation steps, termination techniques, and testing procedures gives you a lot of control. It means you can create a fast and reliable network connection that supports all your digital needs, from simple internet browsing to complex business software. So, understanding the Cat6 network cable diagram and how this type of cable is used in network installations for faster and more reliable connections is, basically, a very valuable skill for today's connected world. You can learn more about network solutions on our site, and find more helpful tips on optimizing your home or business network.


Detail Author:
- Name : Esther Von Jr.
- Username : shields.earline
- Email : wilburn.hand@yahoo.com
- Birthdate : 2000-11-30
- Address : 8057 Demario Lakes Port Adaline, WY 86222-3477
- Phone : +1 (458) 267-8638
- Company : Witting-Mills
- Job : Credit Checker
- Bio : Quos qui maiores cumque neque totam molestiae. Et dolore quo temporibus est quo. Explicabo perferendis ut saepe iusto ut hic. Est est facere molestias vel.
Socials
twitter:
- url : https://twitter.com/tomasarodriguez
- username : tomasarodriguez
- bio : Libero in voluptatem repellendus vel. Laudantium debitis dolor quae iste. Rem quas libero eligendi porro nihil sint. Quod iste id ex laboriosam saepe earum.
- followers : 5460
- following : 2938
tiktok:
- url : https://tiktok.com/@trodriguez
- username : trodriguez
- bio : Earum odit libero voluptatem. Harum molestiae earum natus atque.
- followers : 4474
- following : 2518
linkedin:
- url : https://linkedin.com/in/tomasa_official
- username : tomasa_official
- bio : Qui ea sed laudantium explicabo.
- followers : 6146
- following : 2752
